
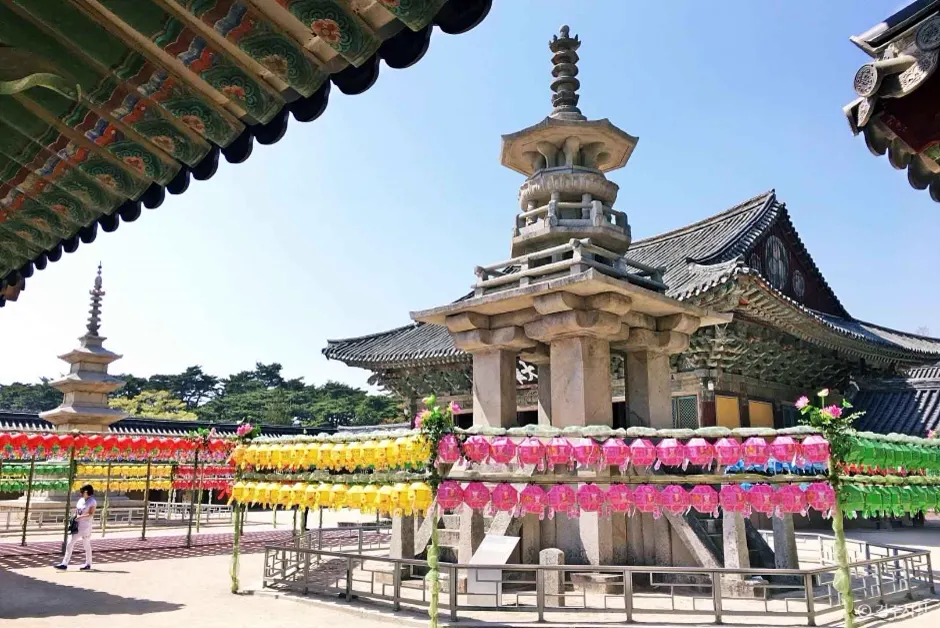
The short answer:Bulguksa and Seokguram complement each other, but the real constraint is the mountain transfer, waiting time and return buffer—not the line on a map.
Protect the experience you actually want
Bulguksa and Seokguram look like an obvious pair on a map. In practice, they create a directional mountain day. Bulguksa asks for time across terraces, courtyards and steps. Seokguram adds an uphill road, a scheduled connection and another walk. Combine them when both the temple architecture and the mountain destination are genuine reasons for the trip; do not combine them merely to collect two names.
Ask which experience must be protected. If the answer is the temple grounds, keep Bulguksa with a downtown heritage route. If the answer is the Tohamsan mountain direction, make Seokguram the optional second commitment and accept a less flexible return.
Count the transfer chain, not the map distance
Start with the trip from your room to Bulguksa, then count the connection toward Seokguram, the wait between services and the return to town. The hidden cost is standing at a stop, missing one departure, walking on stone and losing the empty space that a day plan needs. An early start lowers the risk; a late ambitious start rarely does.
For children, older travellers or anyone uncomfortable on uneven surfaces, treat Seokguram as cancellable. Decide at Bulguksa after checking weather, energy and the next workable connection. Returning downtown for a meal and another heritage stop is a completed day, not a failure.
Bulguksa and Seokguram complement each other, but the real constraint is the mountain transfer, waiting time and return buffer—not the line on a map.
How the seasons alter the second site
Spring makes Bulguksa attractive while the mountain can still feel cold. Finish the lower temple first and make the uphill decision later. Summer offers longer light, but humidity and the ascent can cost more energy than expected; water and shade matter more than another courtyard. Autumn colour and visibility can justify the mountain trip, but a weekend return needs an earlier cut-off. Winter shortens daylight and magnifies wind, ice and waiting, so Bulguksa plus a central heritage route is often the stronger plan.
Bad weather is a valid reason not to climb. “We are already in Gyeongju” is not a transport strategy. Keep Seokguram for another visit if the conditions would turn the main temple into a rushed stop.
Choose the room around the route
A central Gyeongju room works when the next morning still begins with a bus, food and a city connection. It gives the combined day a practical launch point and protects dinner after returning from the mountain. If you stay one night and leave early the next day, the station-and-centre corridor is more useful than a remote base. The reason to choose it is the saved evening, luggage and departure buffer—not a generic claim that it is convenient.
Before choosing a room, check luggage storage, check-out timing and the direction back from Bulguksa. Those small details decide whether Seokguram remains a real option after the first site.
Two plans you can execute
Plan A is the complete heritage day: Bulguksa first, Seokguram only after the live conditions look good, then back to town without adding another distant sight. Plan B is the stable day: Bulguksa, lunch, Daereungwon or the museum, and Seokguram on a future visit. Choose a central Gyeongju base first, keep the mountain leg removable, and use the stay page CTA to make the route practical.
Seasonal finish and return check
Spring makes Bulguksa attractive while the mountain can still feel cold. Finish the lower temple first and make the uphill decision later. Summer offers longer light, but humidity and the ascent can cost more energy than expected; water and shade matter more than another courtyard. Autumn colour and visibility can justify the mountain trip, but a weekend return needs an earlier cut-off. Winter shortens daylight and magnifies wind, ice and waiting, so Bulguksa plus a central heritage route is often the stronger plan.
A central Gyeongju room works when the next morning still begins with a bus, food and a city connection. It gives the combined day a practical launch point and protects dinner after returning from the mountain. If you stay one night and leave early the next day, the station-and-centre corridor is more useful than a remote base. The reason to choose it is the saved evening, luggage and departure buffer—not a generic claim that it is convenient.
Where to stay
Before choosing a room, check luggage storage, check-out timing and the direction back from Bulguksa. Those small details decide whether Seokguram remains a real option after the first site.
See stay choicesPlan A is the complete heritage day: Bulguksa first, Seokguram only after the live conditions look good, then back to town without adding another distant sight. Plan B is the stable day: Bulguksa, lunch, Daereungwon or the museum, and Seokguram on a future visit. Choose a central Gyeongju base first, keep the mountain leg removable, and use the stay page CTA to make the route practical.
Five checks before leaving
- Ask which experience must be protected. If the answer is the temple grounds, keep Bulguksa with a downtown heritage route. If the answer is the Tohamsan mountain direction, make Seokguram the optional second commitment and accept a less flexible return.
- For children, older travellers or anyone uncomfortable on uneven surfaces, treat Seokguram as cancellable. Decide at Bulguksa after checking weather, energy and the next workable connection. Returning downtown for a meal and another heritage stop is a completed day, not a failure.
- Bad weather is a valid reason not to climb. “We are already in Gyeongju” is not a transport strategy. Keep Seokguram for another visit if the conditions would turn the main temple into a rushed stop.
- Before choosing a room, check luggage storage, check-out timing and the direction back from Bulguksa. Those small details decide whether Seokguram remains a real option after the first site.
- Plan A is the complete heritage day: Bulguksa first, Seokguram only after the live conditions look good, then back to town without adding another distant sight. Plan B is the stable day: Bulguksa, lunch, Daereungwon or the museum, and Seokguram on a future visit. Choose a central Gyeongju base first, keep the mountain leg removable, and use the stay page CTA to make the route practical.
KriNavi decision card
Best use of this page: Bulguksa to Seokguram Without a Car: Can One Gyeongju Day Hold Both?
Core judgement: Compare the bus direction, walking effort, seasons and hotel base before combining Bulguksa and Seokguram in one car-free day.
This card only reorganizes sources already listed by the page. Recheck live hours, prices, service, and restrictions for the travel date.